
This pumpkin paper craft is derived from a free doily .wpc cutting file from the good people at Pazzles.
http://www.pazzles.net/wordpress/library?g2_itemId=122693
If you read my blog post about the Pazzles Inspiration die cut machine, you know that I own this die cut machine and think it is awesome.
Check out their site for more free files, or for some inspiration. Lots of good ideas!
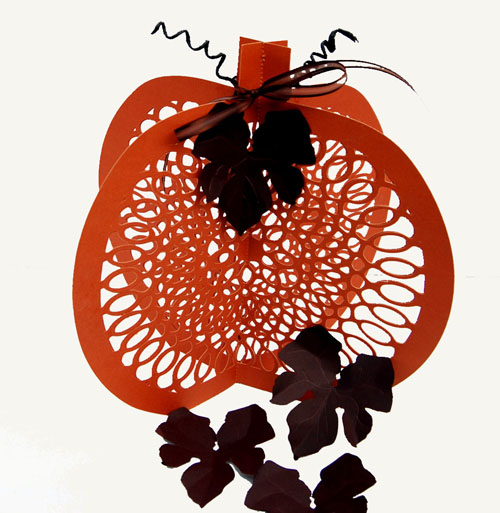
I wanted to make a paper craft for the fall season and took the file one step further, altering it in Adobe Illustrator to a pumpkin shape. I think the project turned out well! Download the free template and follow the instructions below to make your own beautiful lace pumpkin fall paper craft.
If you are cutting out this project on a Pazzles Inspiration, the following settings might be of use to you. I went through a lot of card stock before I found the settings that worked for me. The Pazzles settings are as follows: Blade setting 3.5, Pressure 15, Speed 3, and #Pass 2. I think having two passes are crucial when cutting intricate patterns. Another thing I did (but I do not know if it really helps) is that I put the textured side of the card stock face down on the mat. The smooth side was up. I also put in a fresh blade (I needed a new one after going through the massive amounts of cardstock during the trial period) 🙂 I cut quite a few pieces of the lacy pumpkin pattern after that.The blade was still good shape, and making clean cuts.
Supplies:
- Four sheets 12 x 12 orange cardstock
- 1 or 2 sheets brown cardstock
- Dark floral tape
- Floral wire
- Black ribbon
- Embossing stylus or bone folder
- Glue
Directions:
- Download template(wpc, ai, dxf, eps, pdf and svg files included in download) and use your die cut machine of choice. This can also be printed out onto card stock and cut by hand with a xacto knife. Cut 4 pumpkin patterns out of the orange card stock.
- Cut as many of the decorative pumpkins leaves out of the brown card stock as you desire. Use the embossing stylus or bone folder to score realistic looking veins into the leaves. Curl edges to give leaves a realistic look and feel.
- Fold each pumpkin shape in the middle.
- Without unfolding a pumpkin shape, apply glue on one of its outer faces.
- Glue a second folded pumpkin shape on top of the first one, keeping both pumpkin shapes aligned at the edges.
- Press on the pair of pumpkin shapes to glue them together.
- Continue gluing the pumpkin shapes one on top of the other, making sure they are aligned along the edges.
- After you have glued the first and last pumpkin shape in place, arrange the pumpkin into a circular shape, and tie a black ribbon bow around the “stem.”
- Wrap floral paper around floral wire. Wrap the covered floral wire around a pencil and remove. Glue the curly floral wire on the base of the stem.
- Glue leaves around stem and place randomly around the pumpkin.Enjoy your lacy paper pumpkin project!


